Signal-to-noise ratio stands as a key measure for image clarity in any camera signal noise ratio machine vision system. Higher SNR means less noise and sharper imaging, which allows vision algorithms to reach reliable conclusions. For example, imagine trying to read a barcode through a foggy window—low SNR creates this kind of blur, while high SNR offers clear image clarity. In machine vision, increasing SNR from 20 dB to 40 dB can boost imaging quality and reduce false positives by 15%. Optimizing SNR ensures consistent clarity and accuracy, especially when advanced imaging and AI depend on every detail.
Key Takeaways
- Signal-to-noise ratio (SNR) measures how much useful image data stands out from noise, directly affecting image clarity and accuracy in machine vision.
- Higher SNR leads to clearer images, better object detection, and improved AI performance, making it essential for tasks like barcode reading and medical imaging.
- Sensor size, pixel size, lighting, and camera settings all influence SNR; larger sensors and good lighting boost SNR and image quality.
- Measuring SNR regularly and using noise reduction techniques, including advanced software algorithms, help maintain high image quality in machine vision systems.
- Choosing the right sensor, optimizing lighting, and applying smart processing methods work together to improve SNR and ensure reliable, sharp images.
Signal-to-Noise Ratio Basics
What Is SNR?
Signal-to-noise ratio, often called SNR, measures how much useful information stands out from unwanted interference in an image. In machine vision, the signal to noise ratio describes the relationship between the actual image data and the random noise that appears in each pixel. The signal comes from the total number of photoelectrons detected by a pixel. Larger pixels or higher quantum efficiency can increase this signal. Noise, on the other hand, is the error or interference that naturally occurs in every pixel. This noise can come from many sources, such as photon fluctuations or electronic components.
SNR is calculated by dividing the mean value of the signal by the standard deviation of the noise. The formula looks like this: SNR = μ / σ, where μ is the average signal and σ is the noise level. Sometimes, the ratio is squared to compare the power of the signal to the power of the noise. SNR can be shown as a simple ratio or in decibels (dB), which uses a logarithmic scale. Decibels make it easier to compare different levels of image quality.
Tip: A higher signal to noise ratio means the image has more useful information and less noise, making it easier for computers to analyze.
Why SNR Matters
SNR plays a critical role in machine vision. A high signal-to-noise ratio allows algorithms to detect objects and patterns more accurately. Studies in medical imaging show that SNR gives consistent results across different observers and imaging systems. This reliability makes SNR a trusted way to measure image quality.
In machine vision, SNR affects how well a system can find edges, measure brightness, and see contrast. These factors are important for tasks like sorting products, reading barcodes, or guiding robots. When the signal to noise ratio is high, images look clearer and details stand out. This clarity helps machine vision systems avoid mistakes and improves the performance of AI models.
Sensors with larger full well capacities usually have a higher SNR. Good lighting and proper exposure also help boost the signal-to-noise ratio. However, noise from the environment or the sensor itself can limit SNR. By understanding and improving SNR, engineers can build machine vision systems that deliver reliable and accurate results.
Camera Signal Noise Ratio in Machine Vision Systems

SNR and Image Quality
A camera signal noise ratio machine vision system depends on SNR to deliver high-performance imaging. SNR measures how much useful signal stands out from unwanted noise in each image. Engineers define SNR by comparing the average signal to the standard deviation of the noise. Cameras with high SNR produce images with greater clarity and more visible detail. This clarity helps vision systems detect objects, measure image contrast, and analyze image detail with higher fidelity.
Noise in imaging comes from sources like photon shot noise and electronic interference. These random variations lower image quality by making it harder to see fine detail. In a camera, full well capacity sets the upper limit for the signal a pixel can hold. Larger full well capacity means the pixel can collect more electrons, which increases the maximum SNR and improves dynamic range. Shot noise, which follows the square root of the signal, sets a fundamental limit on SNR. As the signal increases, shot noise becomes the main source of noise, but high-performance imaging systems can still achieve high SNR by maximizing signal collection.
Note: Improving SNR in cameras directly boosts image clarity and fidelity. Techniques like increasing exposure time, using brighter lighting, or applying denoising algorithms help reduce noise and make the useful signal stand out.
The relationship between SNR and image quality is direct. Higher SNR means the camera captures more of the real scene and less random noise. This improvement leads to sharper images, better image contrast, and more reliable imaging for machine vision tasks. In high-performance imaging, a high SNR ensures that every detail is visible, which is critical for applications like medical diagnostics, barcode reading, and automated inspection.
The table below shows how SNR affects system performance in embedded vision, edge AI, and machine learning:
| Factor/Aspect | Effect on SNR and System Performance |
|---|---|
| Signal-to-Noise Ratio (SNR) | Higher SNR means stronger useful signal relative to noise, leading to better image quality crucial for AI/ML accuracy. |
| Impact on Embedded Vision | High SNR enables accurate object recognition, people counting, medical diagnostics, and other edge AI tasks. |
| Causes of Low SNR | Small sensors, low light, high ISO settings introduce noise, degrading system performance by obscuring details. |
| Sensor Size | Larger sensors capture more light, increasing SNR and improving image quality for embedded vision systems. |
| Aperture Size | Wider apertures allow more light, increasing SNR; smaller apertures may require longer exposure, potentially adding noise. |
| ISO Sensitivity | Higher ISO amplifies both signal and noise, potentially lowering SNR; lower ISO improves SNR but needs more light. |
| Exposure Time | Longer exposure increases photon count and SNR (shot noise limited), but may introduce other noise types. |
| Image Processing Algorithms | Advanced denoising algorithms reduce noise, effectively improving SNR and enhancing edge AI performance. |
| Practical Optimization | Use of low-noise cameras, proper heat dissipation, and sensor design are essential to maintain high SNR for reliable ML. |
Cameras with high SNR support high-performance imaging by making sure that AI and machine learning models receive clear, reliable data. When SNR drops, noise can hide important features, causing errors in object detection or measurement. Real-time denoising algorithms, including neural network-based methods, help maintain high SNR and improve the performance of edge AI systems.
Sensor Factors
Sensor design plays a major role in the camera signal noise ratio machine vision system. The size of the sensor, the size of each pixel, and the sensor technology all affect SNR, imaging quality, and overall performance.
Larger sensors and larger pixels collect more light. This increase in light collection boosts SNR, which leads to better clarity and more visible image detail. Cameras with larger pixels often show higher sensitivity, making them ideal for low-light imaging. However, smaller pixels provide higher resolution, allowing the camera to capture finer details, but they collect fewer photons, which can lower SNR and reduce clarity.
| Aspect | Effect of Smaller Pixels | Effect of Larger Pixels | Additional Techniques and Considerations |
|---|---|---|---|
| Pixel Size | Improves spatial resolution; detects finer details | Increases sensitivity by capturing more light | Pixel binning can improve sensitivity but reduces resolution |
| Sensitivity | Reduced due to fewer photons collected per pixel | Increased due to larger photon collection | Proper lighting and high-quality lenses improve image clarity |
| Resolution | Higher spatial resolution, better detail detection | Lower spatial resolution due to larger pixel size | Nyquist criterion requires at least two pixels per smallest feature to avoid aliasing |
Sensor technology also matters. CCD sensors usually have lower noise and higher image quality, especially in low-light conditions. CMOS sensors have improved with back-side illumination (BSI) technology, narrowing the gap in noise and dynamic range. CMOS cameras now offer faster readout speeds and lower power consumption, making them popular for embedded vision and edge AI.
| Performance Aspect | CCD Sensors Characteristics | CMOS Sensors Characteristics |
|---|---|---|
| Image Quality | Higher image quality, especially in low-light conditions | Slightly lower image quality but improving with BSI technology |
| Dynamic Range | Typically higher dynamic range | Slightly lower, but improving |
| Noise Levels | Lower noise due to serial charge transfer | Higher noise, but gap narrowing |
| Power Consumption | Higher power consumption | Lower power consumption |
| Speed | Slower readout speeds | Faster readout speeds |
Full well capacity sets the maximum signal a pixel can hold before it saturates. A higher full well capacity allows the camera to achieve a higher maximum SNR and a wider dynamic range. Shot noise, which comes from the random arrival of photons, limits the SNR at high signal levels. At low signal levels, read noise becomes more important. Cameras with larger full well capacities and optimized sensor design can achieve high SNR, which is essential for high-performance imaging.
Tip: Matching sensor size and pixel size with the lens resolving power helps maintain high SNR and avoid image degradation. This match ensures that the camera signal noise ratio machine vision system delivers the best possible clarity and fidelity.
Engineers must balance resolution, sensitivity, and dynamic range when choosing a camera for a machine vision system. High SNR, achieved through careful sensor selection and system design, ensures that imaging systems deliver the clarity, fidelity, and detail needed for reliable vision and AI applications.
Measuring SNR
Methods
Engineers measure SNR in cameras by comparing the amount of useful signal to the total noise present in the system. The signal comes from the number of photons detected by the sensor, while noise includes photon shot noise, dark noise from heat, and read noise from electronics. To find the SNR, they divide the total signal by the combined noise. This method gives a clear picture of how much real information stands out from unwanted interference.
Some cameras use environmental controls, such as cooling, to lower dark noise. Others use advanced electronics to reduce read noise. These improvements help increase the maximum signal to noise ratio. Preprocessing techniques, like Gaussian smoothing or wavelet denoising, also boost SNR by removing unwanted noise before analysis. These steps make edges and details clearer, which is important for automated inspection and recognition tasks. When SNR rises, edge clarity and object detection improve, leading to better performance in machine vision systems.
Tip: Regularly check SNR using standard test charts and software tools to ensure cameras meet minimum SNR levels for your application.
Typical Values
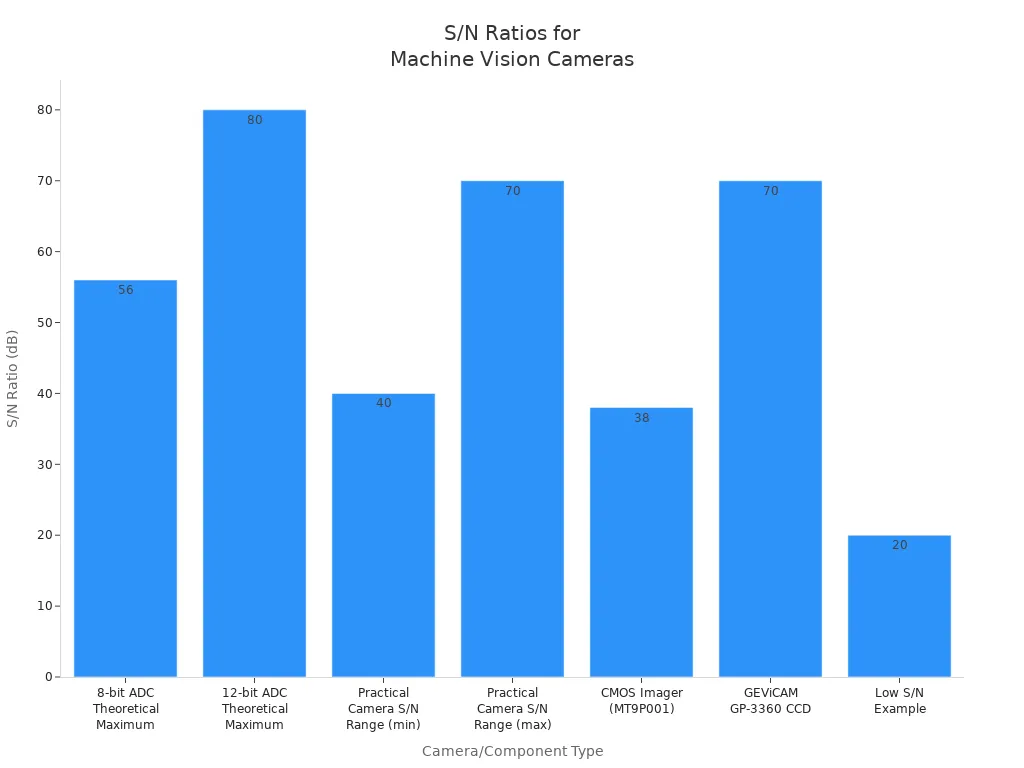
SNR values in cameras can vary widely. Most practical machine vision cameras have SNR values between 40 and 70 dB. High-quality CCD cameras can reach up to 70 dB, while some CMOS imagers may show SNR just above 38 dB. If SNR drops to around 20 dB, images become too noisy for reliable use. Applications that need sharp edges and accurate detection, such as automated inspection, require higher SNR for best performance.
| Camera/Component Type | Typical S/N Ratio (dB) | Application Notes |
|---|---|---|
| 8-bit ADC Theoretical Maximum | ~56 dB | Bit depth limits SNR; real cameras often lower due to noise. |
| 12-bit ADC Theoretical Maximum | ~80 dB | Higher bit depth improves digitization; actual SNR depends on sensor. |
| Typical Practical Camera S/N Range | 40 – 70 dB | 40 dB common for standard cameras; 70 dB for high-quality CCDs. |
| Example CMOS Imager (MT9P001) | >38 dB | Actual SNR limited by sensor, not just ADC. |
| GEViCAM GP-3360 Monochrome CCD | ~70 dB | High SNR, low noise, ideal for demanding machine vision. |
| Low S/N Example | ~20 dB | Too noisy for most machine vision applications. |
Cameras with higher SNR produce images with less noise, making them suitable for tasks that demand high accuracy. Meeting or exceeding minimum SNR levels ensures that machine vision systems deliver reliable results and strong performance.
Improving SNR
Sensor Choice
Selecting the right sensor is one of the most practical steps to improve snr in machine vision. High-quality sensors with larger pixels collect more light, which boosts sensitivity and helps cameras capture more detail, especially in low-light conditions. Larger sensors also improve light sensitivity, but they can make cameras bigger and more expensive. Some cameras use binning to combine pixels, which increases sensitivity and reduces noise, though it may lower resolution. A higher dynamic range allows cameras to capture both bright and dark areas, making imaging more reliable in scenes with strong contrast. The table below shows how different sensor characteristics affect high snr and imaging performance:
| Sensor Characteristic | Impact on SNR | Additional Notes |
|---|---|---|
| Pixel Size | Larger pixels improve SNR, especially in low light | Trade-off with resolution and cost |
| Sensor Size | Larger sensors enhance sensitivity | Increases camera size and cost |
| Output Modes | Binning increases sensitivity, ROI optimizes data | Balances speed and noise reduction |
| Dynamic Range | Higher range improves contrast and detail | Important for high-contrast scenes |
| Shutter Type | Global shutter preserves image quality | Best for fast-moving objects |
Lighting and Environment
Lighting plays a key role in imaging solutions. Bright, stable lighting helps cameras achieve high snr by reducing noise and making features stand out. Smart LED lighting with feedback control keeps light output steady, which improves image consistency. Uniform illumination prevents shadows and overexposure, helping cameras capture optimized images. The right color of light can also highlight important detail. For example, red light increases contrast, while blue light brings out fine features. Controlling ambient light is important because stray light can add noise and lower image quality. High temperatures increase thermal noise in cameras, so keeping cameras cool helps maintain high snr and clear imaging.
Tip: Use lighting with feedback control and keep cameras cool for the best imaging results.
Processing Techniques
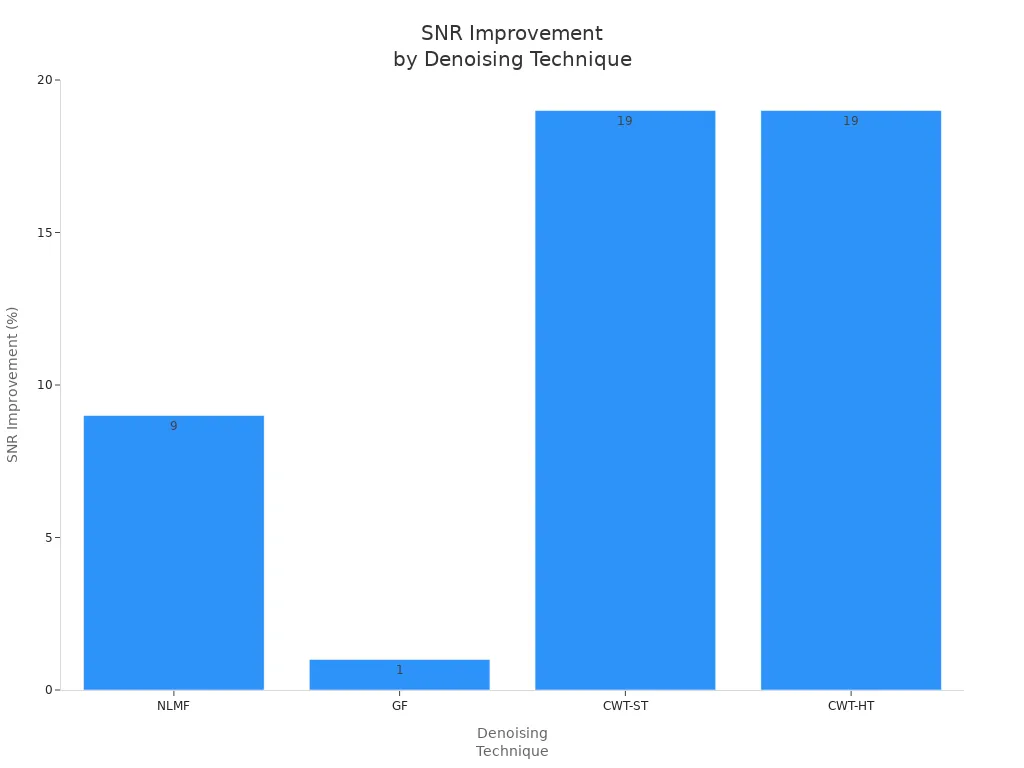
Software can further improve high snr in vision systems. Traditional algorithms like Contrast Limited Adaptive Histogram Equalization (CLAHE) and gamma correction adjust brightness and contrast, making detail easier to see. Advanced deep learning models, such as RetinexNet and KIND++, learn to remove noise and enhance imaging quality. These methods help cameras deliver clear, optimized images even in tough conditions. Combining hardware improvements with smart software gives the best results for imaging performance. Studies show that wavelet-based denoising can increase snr by up to 19%, making imaging more reliable for vision tasks.
Signal-to-noise ratio directly shapes imaging clarity and fidelity in machine vision. AI-driven systems that optimize SNR show stronger detection and more reliable high fidelity visuals, even in challenging environments. For consistent imaging and quality control, teams should follow these best practices:
- Measure SNR and use data visualization to spot noise.
- Apply noise reduction algorithms and deep de-noising autoencoders.
- Select features that highlight the signal and improve imaging results.
These steps help maintain top performance in machine vision projects.
FAQ
What is a good SNR value for machine vision cameras?
Most machine vision tasks need an SNR above 40 dB. High-precision jobs, like medical imaging, work best with SNR values closer to 70 dB. Higher SNR means clearer images and fewer errors.
How does lighting affect SNR in images?
Lighting increases the signal that a camera sensor receives. Bright, even lighting helps the sensor collect more useful data. This boost in signal improves SNR and makes images clearer for analysis.
Can software improve SNR after capturing an image?
Yes! Image processing software can reduce noise and enhance details. Techniques like denoising filters or deep learning models help increase SNR. These tools make images easier for computers to analyze.
Why do small sensors often have lower SNR?
Small sensors have smaller pixels. These pixels collect less light, which lowers the signal. Less signal means more noise compared to useful data, so SNR drops. Larger sensors usually perform better in low light.
Does increasing ISO always improve SNR?
Increasing ISO makes the sensor more sensitive, but it also boosts noise. Higher ISO can help in low light, but it often lowers SNR. For best results, use the lowest ISO that gives enough brightness.
See Also
A Comprehensive Guide To Thresholding In Vision Systems
Does Applying Filters Improve Accuracy In Vision Systems
The Importance Of Image Recognition For Quality Control
Essential Camera Resolution Concepts For Machine Vision Users
Understanding The Effect Of Frame Rate On Vision Performance